
Linux BTRFS Lab
Created By Christian Deacon
This is a small lab to show my results on testing Linux BTRFS's out-of-band deduplication feature. BTRFS is an advanced Linux file system that comes with many neat features!
Motives
While I'm interested in Linux file systems in general, a gaming community I help out in has a dedicated server running Linux with 512 GBs of disk space utilizing the ext4 file system that runs multiple servers for the game Counter-Strike: Global Offensive. CS:GO's base installation files are around ~33 GBs each which resulted in the dedicated server running low on disk space without many custom game server files. Using hard links is an option, but since they utilize Pterodactyl/Docker, implementing a hard-link approach would be more difficult since Pterodactyl's mount feature wouldn't work because we'd have hard links on separate file systems which is incompatible. Therefore, since they are buying a new machine soon, I wanted to look into using different Linux file systems that can utilize compression and/or deduplication to save disk space. I assumed the deduplication feature with file systems such as BTRFS would benefit a lot in this situation since the 33 GBs of base installation files for CS:GO are identical.
Lab Specs
- Created on my 'SpyKids' home server running Ubuntu 22.04.
- Virtual machine created with KVM/QEMU running Ubuntu 23.04.
- Two virtual cores.
- 4 GBs of RAM.
- 1 x 200 GBs SSD (virtio driver).
Output from lshw -short on VM.
1christian@sk-btrfstest01:~$ sudo lshw -short
2H/W path           Device      Class          Description
3=========================================================
4                               system         Standard PC (Q35 + ICH9, 2009)
5/0                             bus            Motherboard
6/0/0                           memory         96KiB BIOS
7/0/400                         processor      Intel(R) Core(TM) i7-8700K CPU @ 3.70GHz
8/0/401                         processor      Intel(R) Core(TM) i7-8700K CPU @ 3.70GHz
9/0/1000                        memory         4GiB System Memory
10/0/1000/0                      memory         4GiB DIMM RAM
11/0/100                         bridge         82G33/G31/P35/P31 Express DRAM Controller
12/0/100/1           /dev/fb0    display        QXL paravirtual graphic card
13/0/100/2                       bridge         QEMU PCIe Root port
14/0/100/2/0                     network        Virtio network device
15/0/100/2/0/0       enp1s0      network        Ethernet interface
16/0/100/2.1                     bridge         QEMU PCIe Root port
17/0/100/2.1/0                   bus            QEMU XHCI Host Controller
18/0/100/2.1/0/0     usb1        bus            xHCI Host Controller
19/0/100/2.1/0/0/1   input4      input          QEMU QEMU USB Tablet
20/0/100/2.1/0/1     usb2        bus            xHCI Host Controller
21/0/100/2.2                     bridge         QEMU PCIe Root port
22/0/100/2.2/0                   communication  Virtio console
23/0/100/2.2/0/0                 generic        Virtual I/O device
24/0/100/2.3                     bridge         QEMU PCIe Root port
25/0/100/2.3/0                   storage        Virtio block device
26/0/100/2.3/0/0     /dev/vda    disk           214GB Virtual I/O device
27/0/100/2.3/0/0/1   /dev/vda1   volume         1023KiB BIOS Boot partition
28/0/100/2.3/0/0/2   /dev/vda2   volume         199GiB EFI partition
29/0/100/2.4                     bridge         QEMU PCIe Root port
30/0/100/2.4/0                   generic        Virtio memory balloon
31/0/100/2.4/0/0                 generic        Virtual I/O device
32/0/100/2.5                     bridge         QEMU PCIe Root port
33/0/100/2.5/0                   generic        Virtio RNG
34/0/100/2.5/0/0                 generic        Virtual I/O device
35/0/100/2.6                     bridge         QEMU PCIe Root port
36/0/100/2.7                     bridge         QEMU PCIe Root port
37/0/100/3                       bridge         QEMU PCIe Root port
38/0/100/3.1                     bridge         QEMU PCIe Root port
39/0/100/3.2                     bridge         QEMU PCIe Root port
40/0/100/3.3                     bridge         QEMU PCIe Root port
41/0/100/3.4                     bridge         QEMU PCIe Root port
42/0/100/3.5                     bridge         QEMU PCIe Root port
43/0/100/1b          card0       multimedia     82801I (ICH9 Family) HD Audio Controller
44/0/100/1f                      bridge         82801IB (ICH9) LPC Interface Controller
45/0/100/1f/0                    communication  PnP device PNP0501
46/0/100/1f/1                    input          PnP device PNP0303
47/0/100/1f/2                    input          PnP device PNP0f13
48/0/100/1f/3                    system         PnP device PNP0b00
49/0/100/1f/4                    system         PnP device PNP0c01
50/0/100/1f.2        scsi0       storage        82801IR/IO/IH (ICH9R/DO/DH) 6 port SATA Controller [AHCI mode]
51/0/100/1f.2/0.0.0  /dev/cdrom  disk           QEMU DVD-ROM
52/0/100/1f.3                    bus            82801I (ICH9 Family) SMBus Controller
53/1                 input0      input          Power Button
54/2                 input1      input          AT Translated Set 2 keyboard
55/3                 input3      input          ImExPS/2 Generic Explorer Mouse
56/4                 input6      input          spice vdagent tablet
Output from uname -r on VM.
1christian@sk-btrfstest01:~$ sudo uname -r
26.2.0-20-generic
Output from cat /etc/*-release on VM.
1christian@sk-btrfstest01:~$ cat /etc/*-release
2DISTRIB_ID=Ubuntu
3DISTRIB_RELEASE=23.04
4DISTRIB_CODENAME=lunar
5DISTRIB_DESCRIPTION="Ubuntu 23.04"
6PRETTY_NAME="Ubuntu 23.04"
7NAME="Ubuntu"
8VERSION_ID="23.04"
9VERSION="23.04 (Lunar Lobster)"
10VERSION_CODENAME=lunar
11ID=ubuntu
12ID_LIKE=debian
13HOME_URL="https://www.ubuntu.com/"
14SUPPORT_URL="https://help.ubuntu.com/"
15BUG_REPORT_URL="https://bugs.launchpad.net/ubuntu/"
16PRIVACY_POLICY_URL="https://www.ubuntu.com/legal/terms-and-policies/privacy-policy"
17UBUNTU_CODENAME=lunar
18LOGO=ubuntu-logo
Partition Table When Installing Ubuntu 23.04
Here is a screenshot of the VM's partition table/configuration during the Ubuntu installation.
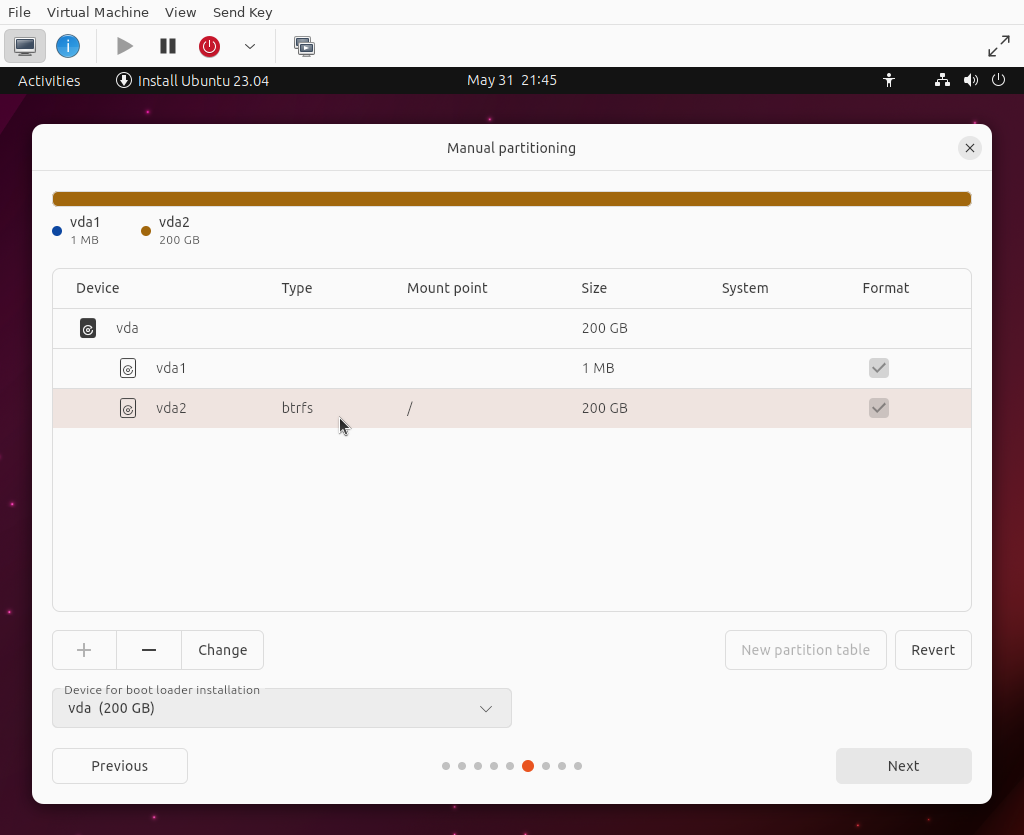
For simplicity, I created a single partition for the entire hard drive mounted at / (root) which uses BTRFS.
Installing Deduplication Tools
There are multiple deduplication tools you can install or build on your system. In this lab, we'll be using Duperemove. For Ubuntu 23.04, you may run the following apt command to install Duperemove via package manager.
1sudo apt install -y duperemove
Starting Disk Space
Here's the output from df -h on the VM with a vanilla installation of Ubuntu 23.04.
1christian@sk-btrfstest01:~$ df -h
2Filesystem      Size  Used Avail Use% Mounted on
3tmpfs           390M  1.7M  389M   1% /run
4/dev/vda2       200G  6.5G  192G   4% /
5tmpfs           2.0G     0  2.0G   0% /dev/shm
6tmpfs           5.0M  8.0K  5.0M   1% /run/lock
7tmpfs           390M  180K  390M   1% /run/user/1000
Creating Dummy Files
In this lab, we will create a directory with two files. One file will be 15 GBs and the other will be 10 GBs. We can use the dd Linux tool to create these files that are padded with 0's.
1# Create directory.
2mkdir test1
3
4# Change directory.
5cd test1
6
7# Create 15 GBs file.
8dd if=/dev/zero of=filedum1 bs=1G count=15
9
10# Create 10 GBs file.
11dd if=/dev/zero of=filedum2 bs=1G count=10
Note - There are faster commands to create dummy files other than dd. However, dd is the most commonly used which is why I chose to use the command in this lab.
Here is the output from the commands above.
1christian@sk-btrfstest01:~$ # Create directory.
2mkdir test1
3
4# Change directory.
5cd test1
6
7# Create 15 GBs file.
8dd if=/dev/zero of=filedum1 bs=1G count=15
9
10# Create 10 GBs file.
11dd if=/dev/zero of=filedum2 bs=1G count=10
12
1315+0 records in
1415+0 records out
1516106127360 bytes (16 GB, 15 GiB) copied, 25.2724 s, 637 MB/s
1610+0 records in
1710+0 records out
1810737418240 bytes (11 GB, 10 GiB) copied, 23.9933 s, 448 MB/s
Now if we execute ls -lh ., you can see the size of each file in the test directory.
1christian@sk-btrfstest01:~/test1$ ls -lh .
2total 25G
3-rw-rw-r-- 1 christian christian 15G May 31 18:51 filedum1
4-rw-rw-r-- 1 christian christian 10G May 31 18:52 filedum2
Now let's check the output from df -h again.
1christian@sk-btrfstest01:~/test1$ df -h
2Filesystem      Size  Used Avail Use% Mounted on
3tmpfs           390M  1.7M  389M   1% /run
4/dev/vda2       200G   32G  167G  16% /
5tmpfs           2.0G     0  2.0G   0% /dev/shm
6tmpfs           5.0M  8.0K  5.0M   1% /run/lock
7tmpfs           390M  172K  390M   1% /run/user/1000
Testing Duplication
Now, we could copy the directory we just created, but I noticed this automatically handles deduplication due to what the cp command does behind the scenes. Therefore, you won't see what it looks like without deduplication.
However, if you want a quick example, you may execute the following.
1# Go up a directory.
2cd ..
3
4# Copy test1 to test2.
5cp -r test1/ test2/
If you execute du -sh *, you'll see both directories are 25 GBs in size.
1christian@sk-btrfstest01:~$ du -sh *
2...
325G     test1
425G     test2
5...
If we run df -h again, you'll see we have the same size as before (32 GBs used).
1christian@sk-btrfstest01:~$ df -h
2Filesystem      Size  Used Avail Use% Mounted on
3tmpfs           390M  1.7M  389M   1% /run
4/dev/vda2       200G   32G  167G  16% /
5tmpfs           2.0G     0  2.0G   0% /dev/shm
6tmpfs           5.0M  8.0K  5.0M   1% /run/lock
7tmpfs           390M  172K  390M   1% /run/user/1000
This is the deduplication feature working!
Testing Without Copying Directory
Let's try testing without copying the directory which handles deduplication automatically. We will use the same commands as we used the first time to generate large files. However, we'll rename test1 to test2 like the following.
1# Create directory.
2mkdir test2
3
4# Change directory.
5cd test2
6
7# Create 15 GBs file.
8dd if=/dev/zero of=filedum1 bs=1G count=15
9
10# Create 10 GBs file.
11dd if=/dev/zero of=filedum2 bs=1G count=10
Here's the output from above.
1christian@sk-btrfstest01:~$ # Create directory.
2mkdir test2
3
4# Change directory.
5cd test2
6
7# Create 15 GBs file.
8dd if=/dev/zero of=filedum1 bs=1G count=15
9
10# Create 10 GBs file.
11dd if=/dev/zero of=filedum2 bs=1G count=10
12
1315+0 records in
1415+0 records out
1516106127360 bytes (16 GB, 15 GiB) copied, 26.6588 s, 604 MB/s
1610+0 records in
1710+0 records out
1810737418240 bytes (11 GB, 10 GiB) copied, 19.1798 s, 560 MB/s
Now if we run df -h, you can see we're using 57 GBs instead of 32 GBs.
1christian@sk-btrfstest01:~/test2$ df -h
2Filesystem      Size  Used Avail Use% Mounted on
3tmpfs           390M  1.7M  389M   1% /run
4/dev/vda2       200G   57G  142G  29% /
5tmpfs           2.0G     0  2.0G   0% /dev/shm
6tmpfs           5.0M  8.0K  5.0M   1% /run/lock
7tmpfs           390M  172K  390M   1% /run/user/1000
To my understanding, since BTRFS operates in out-of-band mode only, it will not handle deduplication automatically on each write. Therefore, we will have to run the command duperemove with a couple of parameters.
Let's run this command with the -dr flags!
1# Go up one directory.
2cd ..
3
4# Run deduplication command.
5sudo duperemove -dr .
This ends up consuming a bit of CPU since it is scanning files/hashes to determine if the files need to be deduplicated. However, it didn't perform any deduplication on my end. I figured this was due to checksum/block differences. Afterall, we are creating completely separate files rather than copying. Though, the contents of the files should be the same (all zero'd bytes).
Therefore, I started reading the manual page for duperemove (man duperemove). I ended up trying other hashing algorithms which didn't make any differences. I then came across the ---dedupe-options=[OPTIONS] flag which is explained below.
1--dedupe-options=options
2    Comma separated list of options which alter how we dedupe. Prepend 'no' to an option in order to turn it off.
3
4    [no]partial
5        Duperemove can often find more dedupe by comparing portions of extents to each other. This can be a lengthy, CPU  in‐
6        tensive task so it is turned off by default.
7
8        The  code  behind  this  option is under active development and as a result the semantics of the partial argument may
9        change.
10
11    [no]same
12        Defaults to off. Allow dedupe of extents within the same file.
13
14    [no]fiemap
15        Defaults to on. Duperemove uses the fiemap ioctl during the dedupe stage to optimize out already deduped  extents  as
16        well as to provide an estimate of the space saved after dedupe operations are complete.
17
18        Unfortunately,  some  versions of Btrfs exhibit extremely poor performance in fiemap as the number of references on a
19        file extent goes up. If you are experiencing the dedupe phase slowing down or 'locking up' this option may give you a
20        significant amount of performance back.
21
22        Note: This does not turn off all usage of fiemap, to disable fiemap during the file scan stage, you will also want to
23        use the --lookup-extents=no option.
24
25    [no]block
26        Deprecated.
I ended up using --dedupe-options partial which took a lot longer to run along with more CPU but performed deduplication. However, it did perform solid deduplication.
1# Run deduplication command with partial option set.
2sudo duperemove --dedupe-options partial -dr .
While this does consume a bit of CPU, you can use the following flags to limit the amount of cores/threads.
1--io-threads=N
2    Use N threads for I/O. This is used by the file hashing and dedupe stages. Default is automatically detected based on number
3    of host cpus.
4
5--cpu-threads=N
6    Use N threads for CPU bound tasks. This is used by the duplicate extent finding stage.  Default  is  automatically  detected
7    based on number of host cpus.
8
9    Note:  Hyperthreading  can adversely affect performance of the extent finding stage. If duperemove detects an Intel CPU with
10    hyperthreading it will use half the number of cores reported by the system for cpu bound tasks.
Conclusion
This was a fun experiment for me because I feel my knowledge with file systems isn't enough and I'll be using the BTRFS file system more in the future along with the deduplication feature. I think it's best to have a cron job run late at night every two weeks or so to perform deduplication with partial support due to how long it takes.
There are other file systems I'm going to also experiment with such as ZFS and XFS which I've heard great things about. With that said, having deduplication in-band sounds like a better approach since it performs deduplication if needed on any write operation. However, this could be costly to the CPU as well, so there are definitely pros to out-of-band deduplication (e.g. being able to pick what directories to perform deduplication on and what times).
One other thing I did want to note is while file systems such as BTRFS have matured a lot over the years, it is stated deduplication still poses a very small risk of data corruption. This is because the deduplication process involves sharing data blocks and any changes to the data block being shared could cause issues. BTRFS does have safeguards for this, though. So make sure to always back up your files if you can!
 About Christian Deacon
About Christian DeaconHi! I am the founder and CEO of Deaconn. I specialize in software and network engineering. I also love system administration and I'm a huge fan of Linux! I contribute to a few open source projects as well!